Securing all the sources of Exchange servers with Authentication is a bigger challenge. But Securing it makes like a lot easier when accounts gets compromised . Only One particular email gets compromised. Also when the application team wish to move to authentication . There should not be any changes from exchange side when they add or remove applications. That’s why submitting message on 587 becomes handy with IMAP. where you don’t need any additional configuration on Exchanges server.
Default IMAP Settings for Outlook on Exchange Server. Make sure Outlook works well. Before testing with any Application with Authentication . I wish to had most of the common application in the same article.
Lets see how to integrate Oracle service-oriented architecture (SOA) with IMAP Integration to Process and notify user via emails
Always use Specified Send Address . If you use default address. It will try to Send As for all the workflow specified.
Note : Recommended to use separate mailboxes for each workflow.
Message Folder INBOX
Note : We are just using the default IMAP Settings of exchange server . No Addition configuration required on exchange server. just the initial IMAP has to be configured properly with SSL.
Lets see how to Configure Manage Engine Service Desk Plus with IMAP Authentication.
Lets see how to create an Anonymous Application relay connectors in Exchange 2016. Every Application needs to have relay permission when they need to send out email using Exchange server.
Like ticketing systems ,Monitoring servers to CRM applications.
Relaying in simple terms –
Email relaying is using an email server to send out emails which does not originate on the
email server.Most Commonly used for fax servers, CRM , Email Routing from different forests etc..
Note that any applications you are allowing should use a valid domain to send out emails as there is a risk of IP getting blacklisted when huge junk emails are sent out using applications. Its always recommended to set a message rate limit on anti-spam servers as well.
Customer wants to get rid of B.com and its Exchange servers. So that he move forward to migrate to the cloud. Without involving B.com
Let’s move
B.com (Child Domain)
testeuro15@B.com
testeuro17@B.com
to
A.com (Root Domain)
testeuro15@B.com
testeuro17@B.com
_
Member of
Distribution Group and a Security Group
Mailbox Active on iPhone
_
As Child Domain and Root Domain are in the same Exchange Forest. (They can see and Connect each other without any issues)
New local Move Request to from Child domain B.com To A.com
Once Mailbox is moved. User will go disconnected in Outlook.
Now Consider Mailbox is Moved from Child domain to root domain
–
Now go to Adsiedit.msc Default Domain Partition of Child domain. Delete any Active Sync Devices below user Object.
or you can use Exchange management shell to remove active sync device of the user.
Now Once All Devices deleted . Now ADMT knows it doesn’t have any leaf object.
Now install ADMT 3.2 on a Server which as access to Child Domain and Root domain.
Now Right Click and Click on User Account Migration Wizard.
B.com Source Domain
A.Com Child Domain
Select Users from domain.
Choose User Accounts from the Source domain.
Choose A.com OU
Update User rights.
Migrate Associated User groups
When you migrate Associate user groups. It moves Distribution group and security group objects from child domain to root domain
and if you open the distribution group and security group members . you can see the migrated users are from root domain and child domain are listed.
but the objects is migrated
Do not migrate source object if a conflict is detected in the target domain.
Groups Associated with the user got migrated.
Tried some test emails from Source and Destination domain.
Distribution list works without any issues.
New Configured Outlook Profile where autodiscover of the source domain is pointing to the destination Exchange server. As they have different DNS zones between child domain and root domain.
_
Once all mailboxes and user objects are moved from child domain to root domain.
We can remove child domain exchange server and Domain controllers without any issues.
In some situations we have to Export all the Distribution group and all the members of it to a CSV file. There is no command let available to retrieve the distribution group and distribution group members in bulk. Pipe line won’t work in this case.
NEW
**** Export all the Distribution group and Distribution Group managers as well***
***Export all the Dynamic Distribution group and Dynamic Distribution Group managers as well***
DisplayName
Alias
RecipientType
Recipient OU
Primary SMTP address
Distribution Group
Distribution Group Primary SMTP address
Distribution Group Managers
Distribution Group OU
I have wrote a script which will make Exchange Administrators life Easy to export distribution group and its members.
.Requires -version 2 – Runs in Exchange Management Shell
Delivery has failed to these recipients or groups:
“Deleted User/Re created user/Click on it to get the Custom Address“ The email address you entered couldn’t be found. Please check the recipient’s email address and try to resend the message. If the problem continues, please contact your helpdesk.
X500:/o=HOSTING/ou=Exchange Administrative Group (FYDIBOHF23SPDLT)/cn=Recipients/cn=d8d4ee95a3bc4778a40beb269c518dfb-Ramakrishna Redd
Reference
X500 – VALUE
_
/
+20
Blank Space
+28
(
+29
)
@domain.com
To be removed
+40
@
+2E
.
+2C
,
+5F
_
%3d
=
Here is the scenario – I had to remove 200 Mail Contacts and get them created as Mailboxes in 1000 User Environment. As soon as i delete the contacts its going to throw me an IMCEAX error, To Overcome this situation i had to export all them in advance, Had the X500 addresses ready, and Added them to the mailboxes created.
4. Remove the Exchange 2010 Offline address book .
6.You need to remove the servers from the send connectors (Source Transport Servers).
Make sure we don’t have any legacy Exchange servers on the source transport servers of all send connectors.
7.Removing Public Folder Databases using ADSIEDIT.msc (Manual Removal may have adverse impacts).
As you may already know . Public Folder Database is no more.
If you are using public folders in your Exchange organization and decided to get rid of it.
Make sure
Removing all Public folder Data
Ensure OAB distribution is set to web and not using any public folders.
Ensure all clients are Outlook 2007 or later
When I attempt to remove the public folder database I receive this error.
The public folder database cannot be deleted
The public folder database ‘PFDB’ cannot be deleted.
Failed Error:Public folder database “PFDB” is the default public folder database for the following mailbox database(s):
Before deleting the public folder database, assign a new default public folder database to the mailbox database(s).
Connect to the Configuration naming context with ADSIEdit
Navigate to the container that holds the Exchange databases.
For Exchange 2010
CN=Services -> CN=Microsoft Exchange -> CN=organization name -> CN=Administrative Groups -> CN=Exchange Administrative Group (FYDIBOHF23SPDLT) -> CN=Databases.
Right-click the mailbox database you want to remove the default public folder database from and choose Properties.
Scroll down until you find the msExchHomePublicMDB attribute. Highlight it and then click Edit.
Click the Clear button so that the value changes to “not set”.
Click OK
You need to wait for active directory replication. When you try to remove the public folder database again you should find that it now removes without error.
Public folder database successfully removed
If you still end up with PF replica error . you can remove the Public Folder Database Object from ADSIEDIT.MSC
CN=Services -> CN=Microsoft Exchange -> CN=organization name -> CN=Administrative Groups -> CN=Exchange Administrative Group (FYDIBOHF23SPDLT) -> CN=Databases.
Right-click the Public Folder mailbox database
Delete (Manual Removal may have adverse impacts at your risk)
8.Disabling Third Party Services
Like Scan mail and Backupexec it may interrupt the uninstallation process . Start run services.msc stop the services and set to disabled.
bemote (Backup Exec Service)
SMEX_Master SMEX_CmAgentHost.exe (Scan mail for Exchange )
Remove Exchange Server 2010
Start – Run – appwiz.cpl
(Add or Remove Programs) Choose Exchange Server 2010 ,
 Mail Delivery System MAILER-DAEMON@rspamd3-1.sh.yanmail.me
 Sent: Wednesday, August 14, 2019 2:11 PM
 To: prvs=12202f182=arun.ab@azure365pro.com
 Subject: Undeliverable: flight information
 Delivery has failed to these recipients or groups:
 carrie@groups.com
 Your message couldn't be delivered. Try to send it again later. If the problem continues, please contact your email admin.
 Diagnostic information for administrators:
 Generating server: rspamd3-1.sh.yanmail.me
 carrie@groups.com
 Remote Server returned '554 5.3.0 < #5.3.0 x-unix; Spam,Subject or body has spam keywords in system level.>'
 Original message headers:
 Return-Path:
 Received: from rspamd3.sh.yanmail.me (rspamd3.sh.yanmail.me [210.16.190.24])
         by rspamd3-1.sh.yanmail.me (Postfix) with ESMTP id 69E13400270
         for carrie@groups.com; Wed, 14 Aug 2019 18:11:01 +0800 (CST)
 X-yanmailID: 2efb.5d53ddfa.5549d.0 1B2CB400772 20190814 b2a6c4eebe7b11e997f4a4badb2c2b1183634@azure365pro.com
 Received: from mx3.azure365pro.com (unknown [83.111.45.45])
         by rspamd3.sh.yanmail.me (Postfix) with ESMTP id 1B2CB400772;
         Wed, 14 Aug 2019 10:10:02 +0000 (UTC)
 Authentication-Results: mx3.azure365pro.com; dkim=none (message not signed) header.i=none; spf=None smtp.pra=arun.ab@azure365pro.com; spf=Fail smtp.mailfrom=arun.ab@azure365pro.com; spf=None smtp.helo=postmaster@EXCH1.azure365pro.com
 Received-SPF: None (mx3.azure365pro.com: no sender authenticity
   information available from domain of
   arun.ab@azure365pro.com) identity=pra;
   client-ip=172.21.1.45; receiver=mx3.azure365pro.com;
   envelope-from="arun.ab@azure365pro.com";
   x-sender="arun.ab@azure365pro.com";
   x-conformance=sidf_compatible
 Received-SPF: Fail (mx3.azure365pro.com: domain of
   arun.ab@azure365pro.com does not designate 172.21.1.45 as
   permitted sender) identity=mailfrom; client-ip=172.21.1.45;
   receiver=mx3.azure365pro.com;
   envelope-from="arun.ab@azure365pro.com";
   x-sender="arun.ab@azure365pro.com";
   x-conformance=sidf_compatible; x-record-type="v=spf1";
   x-record-text="v=spf1 mx ip4:83.111.59.85 ip4:83.111.59.91
   ip4:194.170.218.45 ip4:83.111.45.45 -all"
 Received-SPF: None (mx3.azure365pro.com: no sender authenticity
   information available from domain of
   postmaster@EXCH1.azure365pro.com) identity=helo;
   client-ip=172.21.1.45; receiver=mx3.azure365pro.com;
   envelope-from="arun.ab@azure365pro.com";
   x-sender="postmaster@EXCH1.azure365pro.com";
   x-conformance=sidf_compatible
 X-Ironport-Dmarc-Check-Result: validskip
 IronPort-SDR: tJPXFRc2sF6vCBvYaRYfC54vheytHvCqbrz+WJiVwLC5gDActvRNIBeJxOiYO83GTIYNinupWy
  js2actTGrLgg==
 IronPort-PHdr: =?us-ascii?q?9a45=3AEvE6QR+ReM/esP9uRHKM819IXTAuvvDOBiVQ1K?=
  =?us-ascii?q?IIvI4IwLz6GQhODcAOGHoQ6jDJBZIZ7ZIwzg3ECAgICCQIVgSk+gQlxTXOCb?=
  =?us-ascii?q?AmCRReBBAECBSQcggOIF4I8cowygSKBIQEB?=
 X-IronPort-AV: E=Sophos;i="5.64,384,1559505600";
    d="jpg'145?png'145,150?scan'145,150,208,217,150,145";a="3173282"
 Received: from unknown (HELO EXCH1.azure365pro.com) ([172.21.1.45])
   by mx3.azure365pro.com with ESMTP/TLS/ECDHE-RSA-AES128-SHA256; 14 Aug 2019 14:09:56 +0400
 Received: from EXCH4.azure365pro.com (172.21.1.454) by EXCH1.azure365pro.com
  (172.21.1.45) with Microsoft SMTP Server (version=TLS1_2,
  cipher=TLS_ECDHE_RSA_WITH_AES_128_CBC_SHA256_P256) id 15.1.1466.3; Wed, 14
  Aug 2019 14:09:56 +0400
 Received: from EXCH4.azure365pro.com ([172.21.1.454]) by
  EXCH4.azure365pro.com ([172.21.1.454]) with mapi id 15.01.1466.012; Wed, 14
  Aug 2019 14:09:56 +0400
 From: Arun ab arun.ab@azure365pro.com
 To: "carrie@groups.com" carrie@groups.com, Huang
         huang.huang@mz.com
 CC: david david@groups.com, Aseeb Abdul Khader
         aseeb.abdul@azure365pro.com
 Subject: RE: flight information
 Thread-Topic: flight information
 Thread-Index: AQHVUbMHcem8LlXMJ022gk/php1/Lab6bNBg
 Date: Wed, 14 Aug 2019 10:09:56 +0000
 Message-ID: 9679ca5aee5a4dbd89936c63f9991c07@azure365pro.com
 References: b2d75de4bb3211e9bb64d4ae5278bc1212252@azure365pro.com,
        <201908110657434899274@groups.com >
 51887700bda611e99fcb52540073b44e@groups.com
 In-Reply-To: 51887700bda611e99fcb52540073b44e@groups.com
 Accept-Language: en-US
 Content-Language: en-US
 X-MS-Has-Attach: yes
 X-MS-TNEF-Correlator:
 x-originating-ip: [172.21.1.240]
 x-exclaimer-md-config: 74f2138c-68ed-481e-8eaf-f54f1b694524
 Content-Type: text/plain
 MIME-Version: 1.0
Solution –
Remote Server returned ‘554 5.3.0 < #5.3.0 x-unix; Spam,Subject or body has spam keywords in system level.>’
External System Doesn’t like one of your keywords like bad words.or Words typed on a different language. Try Sending a blank Email. Try to Send clearing your signature. That should let you know which keywords causing the issue.
There are different types of trusts, “Two way Transitive Trust“ is the most used and less complicated trust where both the organizations will have all the permissions over the organizations. It doesn’t fit all the scenarios. But most of them.
This will be the Initial Step if your going to do a cross forest migration between two messaging environments or migrate your Active Directory into single domain or coexist to share permissions between two forest.
Source domain – sourceazure365pro.com
Target Domain – targetazure365pro.com
Open Active Directory Domains and Trusts.
Start – Administrative Tools – Active Directory Domains and Trusts
Click on “New Trust”
Am Typing the “Netbios” or root the domain name name of the Target forest
Click on Forest Trust
Click on “Two-way” as we are going to setup – Two way Transitive Trust
Click on “Both this domain and the Specified domain”
Type the Target domain Administrator Credentials
domainname\username
password
Click on “Forest-Wide Authentication”
Outgoing Trust Authentication Level – Local Forest
In the confirm outgoing trust, choose Yes, Confirm the outgoing trust option. Click Next.
In the confirm incoming trust, choose Yes, Confirm the incoming trust option. Click Next.
Choose Yes
The trust relationship has been created successfully in this domain controller. Click Finish.
You can now view the trust relationship from the trusts tab as shown above
You can test by sharing the folder from source domain to target domain or vice versa. Assigning permission to users located from the other side of the forest.
You can see the trusts has been created
After Creation “ Click on Validate to verify the Trusts”
Enter the Target domain Credentials
Its always good to validate the trusts , as a confirmation , that we did the right thing
Choose Yes
Now you can see the Trusts populated in the target domain
Two way transitive Trusts between domains is valid and active now.
Suddenly some of our users who have shared mailboxes configured in their Primary Outlook Profile created outlook rules and removed the shared mailbox from their profile. Started receiving Non Delivery reports while using shared mailboxes using their Outlook rule on shared mailboxes to forward emails. After looking into it. It happened over the newly updated machines.
Looks like these mailboxes have send on behalf and full access over shared mailboxes but shared mailbox is not opened by the user on the primary profile. Once we provided send as permission over the shared mailboxes. it resolved the same.
Consider the following scenario:
You have Full Access and Send On Behalf Of permissions to a shared mailbox in an Exchange Server environment.
You configure a Microsoft Outlook profile for the shared mailbox and enter your own credentials to access it.
You send an email message from this Outlook profile.
Similar error in Outlook Online mode as well
NDR Reference _ 1
From: System Administrator
Sent: Tuesday, November 19, 2019 11:07 AM
Subject: Undeliverable: xxxx
Your message did not reach some or all of the intended recipients.
Subject:&nbsp; xxxxx
Sent:&nbsp;&nbsp;&nbsp;&nbsp; 19/Nov/2019 11:06 AM
The following recipient(s) cannot be reached:
Tam on 19/Nov/2019 11:07 AM
This message could not be sent. Try sending the message again later, or contact your network administrator. You do not have the permission to send the message on behalf of the specified
user. Error is [0x80070005-0x0004dc-0x000524].
Frank on 19/Nov/2019 11:07 AM
This message could not be sent. Try sending the message again later, or contact your network administrator. You do not have the permission to send the message on behalf of the specified
user. Error is [0x80070005-0x0004dc-0x000524].
Salem on 19/Nov/2019 11:07 AM
This message could not be sent. Try sending the message again later, or contact your network administrator. You do not have the permission to send the message on behalf of the specified
user. Error is [0x80070005-0x0004dc-0x000524].
Sath on 19/Nov/2019 11:07 AM
This message could not be sent. Try sending the message again later, or contact your network administrator. You do not have the permission to send the message on behalf of the specified
user. Error is [0x80070005-0x0004dc-0x000524].
NDR Reference _ 2
Subject: Undeliverable:
Your message did not reach some or all of the intended recipients.
The following recipient(s) cannot be reached: Sath on This message could not be sent. Try sending the message again later, or contact your network administrator. Error is [0x80070005-00000000-00000000].
Lets see how to do Office 365 Hybrid Configuration Wizard Step by Step with Test Data Migration and see how to Manage Endpoints. Quick Office 365 Hybrid Migration guide step by step.
Making sure Exchange Server Running Latest CUs in my Case they are running Exchange Servers running latest Cumulative Updates to have stable hybrid.
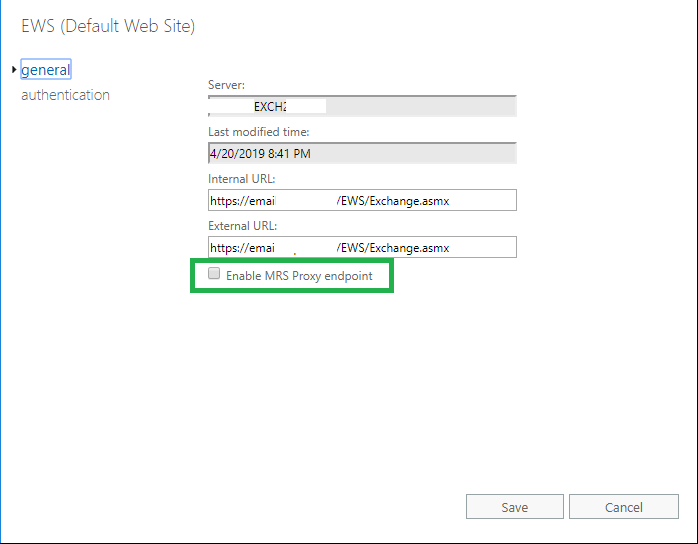
Make sure MRS Proxy Endpoint is Enabled on Internet Facing Client Access Server. If its load balanced. you need to enabled it on all CAS servers
Use IE – Internet Explorer
Login to Exchange Control Panel – On Premises
Hybrid – Enable
412 Cookies are Disabled
Make sure ECP , Office 365 Urls are added to Trusted Sites.
Download And Run the Hybrid Setup
Choose Next
Choose the Optimal Exchange Server
Or Specify the Exchange Client Access Server Manually. (Internet Facing Client Access Server)
uncheck – Use windows Credentials and enter it manually.
Enter On-Premises Credentials
Enter Office365 admin Creds.
Checks Local and Remote Connectivity.
Choose Full Hybrid Configuration.
Choose Configure my Client Access and mailbox servers for Secure Mail Transport (Typical)
Securing Email flow Using TLS transport layer certificates with On-Prem And Office 365 Servers.
Choose Servers to coexist mail between Office 365 and On-premises.
in my case . Both
Certificate Used are not there in all servers.
In my case . Both sites are in different countries. using different SSL Certs.
Exchange the certs between them by exporting as .pfx and import them(you can use Exchange Control Panel to export/import certs). Clicked Search Again. Chosen the certificate
Choose the Certificate for TLS (Transport Layer Security).
Enter the FQDN which has port 25 opened.
Its done.
Make sure 443 is opened and its the internet facing Client Access server.
There are several type of standards available online to improve your domain reputation and email deliverability rate. Most of the enterprise environments implement them all.
What is SPF(Sender Policy Framework) record and let see how to implement them efficiently.
It identifies which mail servers are permitted to send email on behalf of your domain. The purpose of an SPF record is to prevent spammers from sending messages with forged from addresses at your domain.
It’s highly recommended to have a SPF record with an hard fail (-all) created for your domain being spoofed elsewhere in the world. Most of the antispam appliances have SPF record check . which is enabled in most of the environment. A proper SPF required a must to improve email deliverability. We will see various scenarios and how SPF records can be created. Configuring a single SPF for single domain it is fairly simple
Lets consider you are having a single domain ,with no Hybrid. Your Sample SPF will look like below if you are using different IP ranges to send out emails.
Lets consider you are having hybrid with Office 365, Emails are sent out via on-premises environment and via mimecast from office 365 for example. your SPF record will look like below.
Lets consider have have multiple domains hosted, Instead of creating SPF records for each domain . There is a easy of creating one TXT record and you can make all the domains to refer the same TXT record using “include” Option. if you are managing 100 domains and you want to change your Public IP range for example , you don’t have to update all the domains. you can keep updating the primary TXT record. It will save a lot of time if you manage a lot of domains. Lets see how to implement the same . First we should create a TXT record called spf.azure365pro.com with the value (can be a Ipv4 range or mx) , in my case I have specified the public ipv4 range where my Outgoing mails will be. This will be the primary domain and all my additional domains will refer my A record and its a hybrid environment as well.
Now am saying the world as whoever has a TXT record in their public domain as spf.azure365pro.com and if they send out emails from this IP range . Its a trustable source.
The ~all at the end is called a soft fail. It means that recipients may accept mail from another server, but it should be viewed with suspicion. If you change it to -all, you are directing the recipient to reject mail from any server other than these. Majority of the Office 365 mailboxes are configured with hard fail.The soft fail approach is safer and recommended if your not sure of the environment but if you are aware of the environment then hard fail is a must to improve email reliability.
Lets see how to configure additional Domains sending out outbound email
you can configure the additional domains sending as below referring the other record we already creation. if you have any number of addtional domains you can keep referring to the same record. Even the hosters do the same. Even Microsoft does the same.
There are multiple SPF generators available online. you can make use of it as well.
What is DKIM (Domain Keys Identified Mail) record and let see how to implement them efficiently.
DomainKeys Identified Mail is an email authentication method designed that allows the receiver to check that an email was indeed sent and authorized by the owner. It works by adding a digital signature to the headers of an email message. That signature can be validated against a public cryptographic key in in the domain TXT records.
lets see how to implement the in mimecast for example. Its fairly simple.
Administration Policies _ Sign Outbound _ Create a DKIM Record _ You can create the DNS record and wait for the records to replicate and click on Check DNS. You can do it anytime as until you assign this to a policy this signature will not take effect.
Now you can assign to a policy anytime so that it can send out emails with DKIM enabled. always the quickest way of checking it to send a email to gmail and you can click on show original its almost instant to take effect. So that it will show below.
What is DMARC (Domain-based Message Authentication, Reporting & Conformance) record and let see how to implement them efficiently.
DMARC policy allows a sender’s domain to indicate that their emails are protected by SPF and/or DKIM, and tells a receiver what to do if neither of those authentication methods passes – such as to reject the message or quarantine it. The policy can also specify how an email receiver can report back to the sender’s domain about messages that pass and/or fail
For Example the Organization controlling azure365pro.com DNS domain intends to monitor SPF and/or DKIM failure rates and doesn’t expect emails to be sent from subdomains of azure365pro.com. Note that a subdomain can publish its own DMARC record; receivers must check it out before falling back to the organizational domain record.
v is the version p is the policy (none/reject/quarantine) sp the subdomain policy (none/reject/quarantine) pct is the percent of “bad” emails on which to apply the policy rua is the URI to send aggregate reports to.
Most of the time you can see such records, Emails forwarding to DMARC analyzers or to companies who manages your brand protection.
fo: This is a tag that lets mailbox providers know you want message samples of emails that failed either SPF and/or DKIM. There are four value options available: 0: Generate a DMARC failure report if all underlying authentication mechanisms (SPF and DKIM) fail to produce an aligned “pass” result. (default) 1: Generate a DMARC failure report if any underlying authentication mechanism (SPF or DKIM) produced something other than an aligned “pass” result. (recommended) d: Generate a DKIM failure report if the message had a signature that failed evaluation, regardless of its alignment. s: Generate an SPF failure report if the message failed SPF evaluation, regardless of its alignment. Optional tags
Sample Records – ( if you don’t need any email reports but to implement DMARC . you can use like below as well)
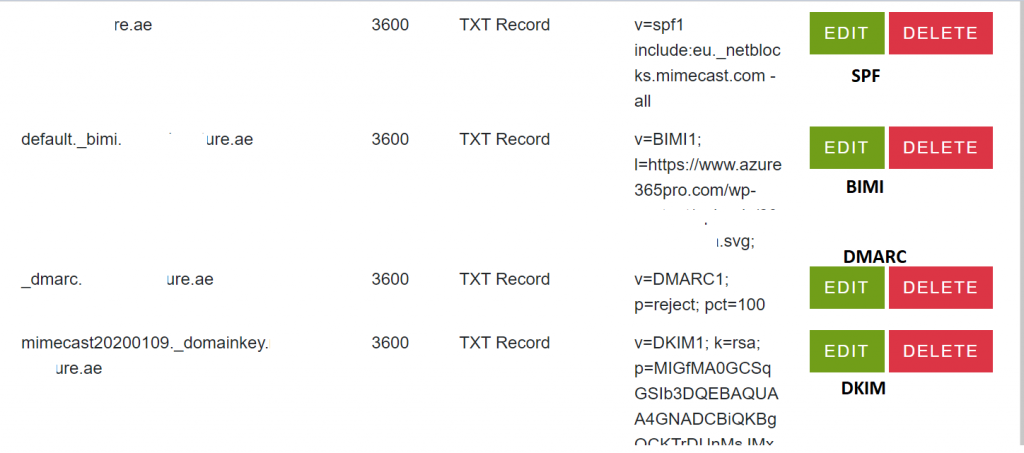
v=DMARC1; p=reject; pct=100
if you just need aggregated URI report you can implement like below.
What is (Brand Indicator Message Identification (BIMI) record and let see how to implement them efficiently.
You need SPF, DKIM, and DMARC to Implement BIMI,Brand Indicators for Message Identification (BIMI) permits Domain Owners to coordinate with Mail User Agents (MUAs) to display brand-specific Indicators next to properly authenticated messages. Have you ever wondered how email logo is appearing in your Outlook Apps for Meetup.com for example for other reputed domains. you can do a bimi record lookup for the domain and you can check they will be using BIMI record to insert the image into your app. For Example the sample record look like below.
v = Version: the value is always BIMI1. (Required) l = Location: the URL of your logo using HTTPS only. (Required) a = Trust authorities: trust certificate to validate domain ownership. (Optional)
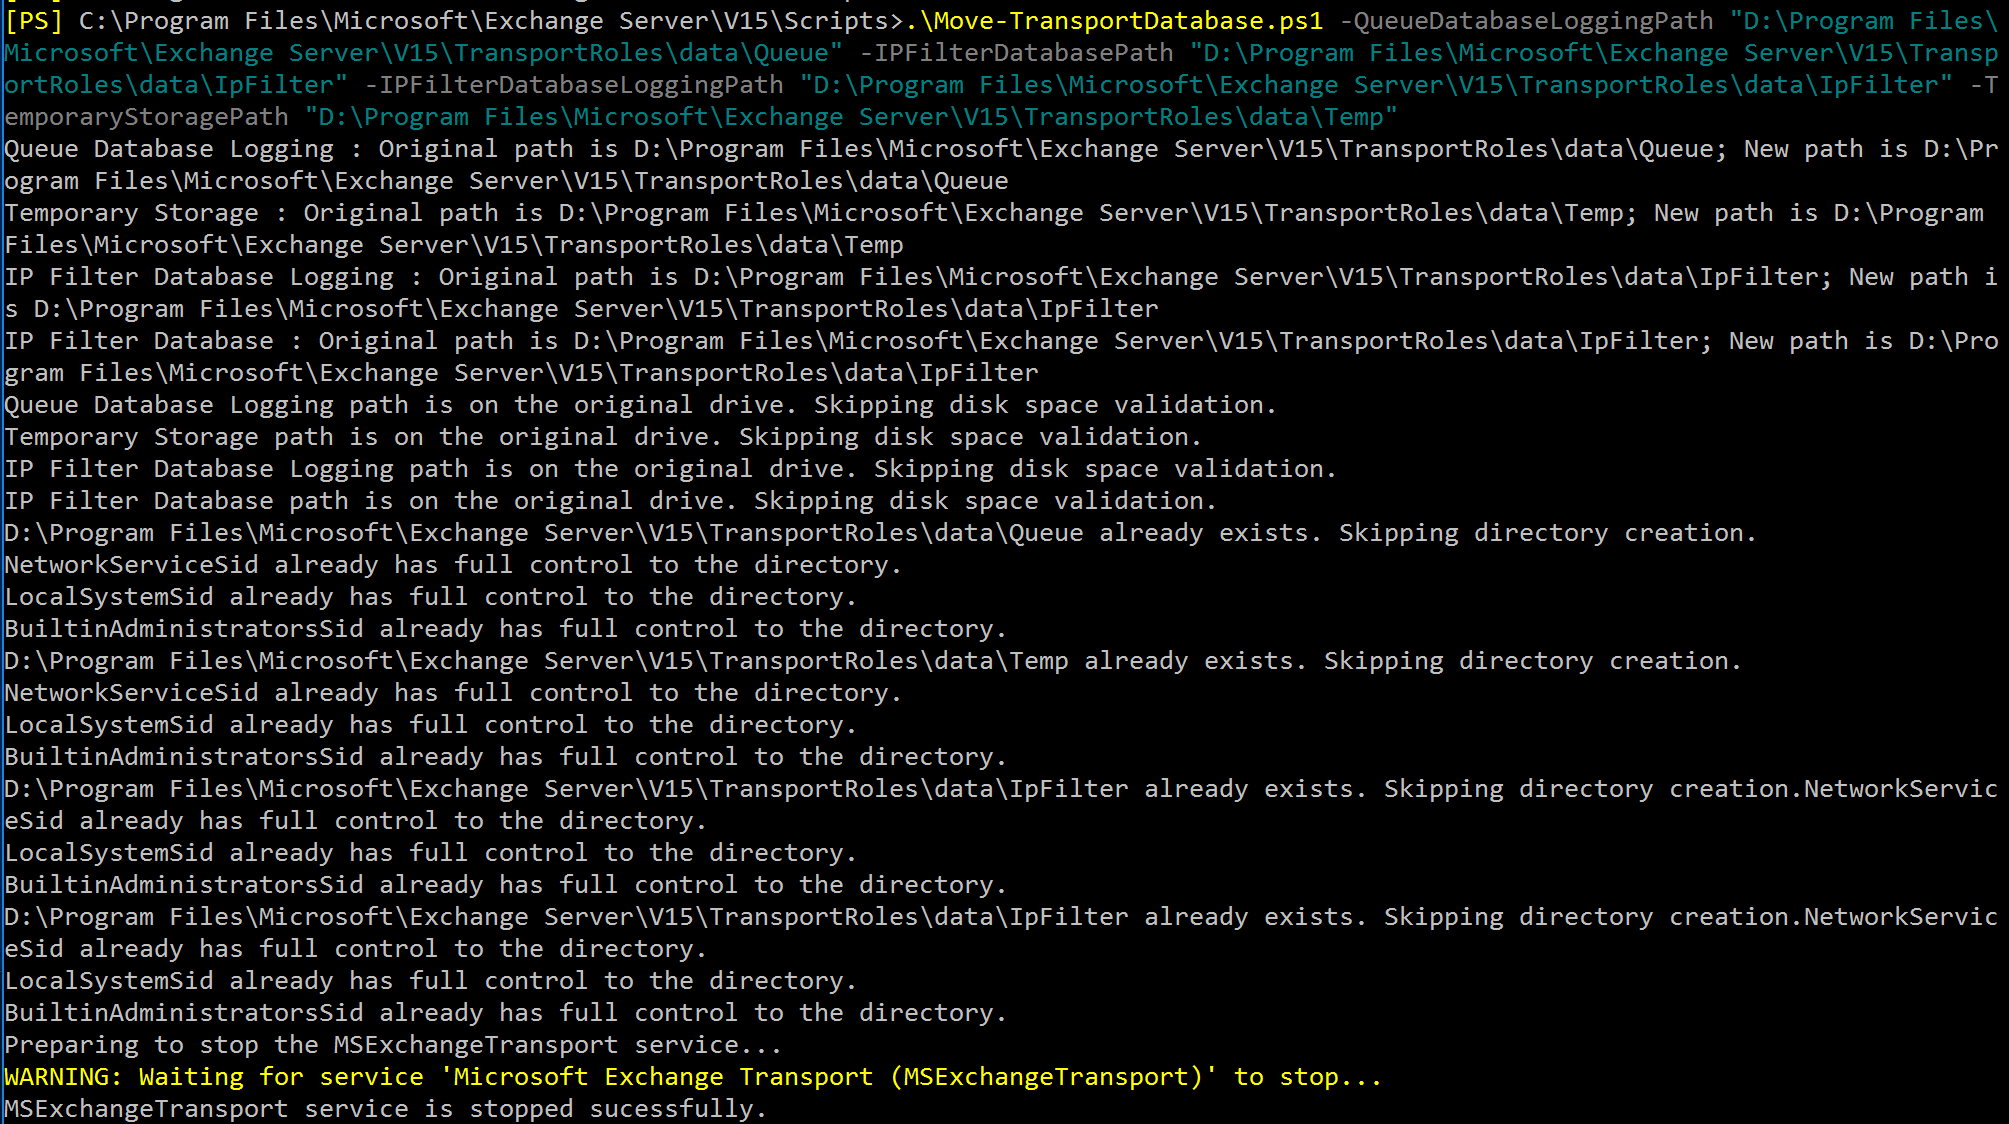
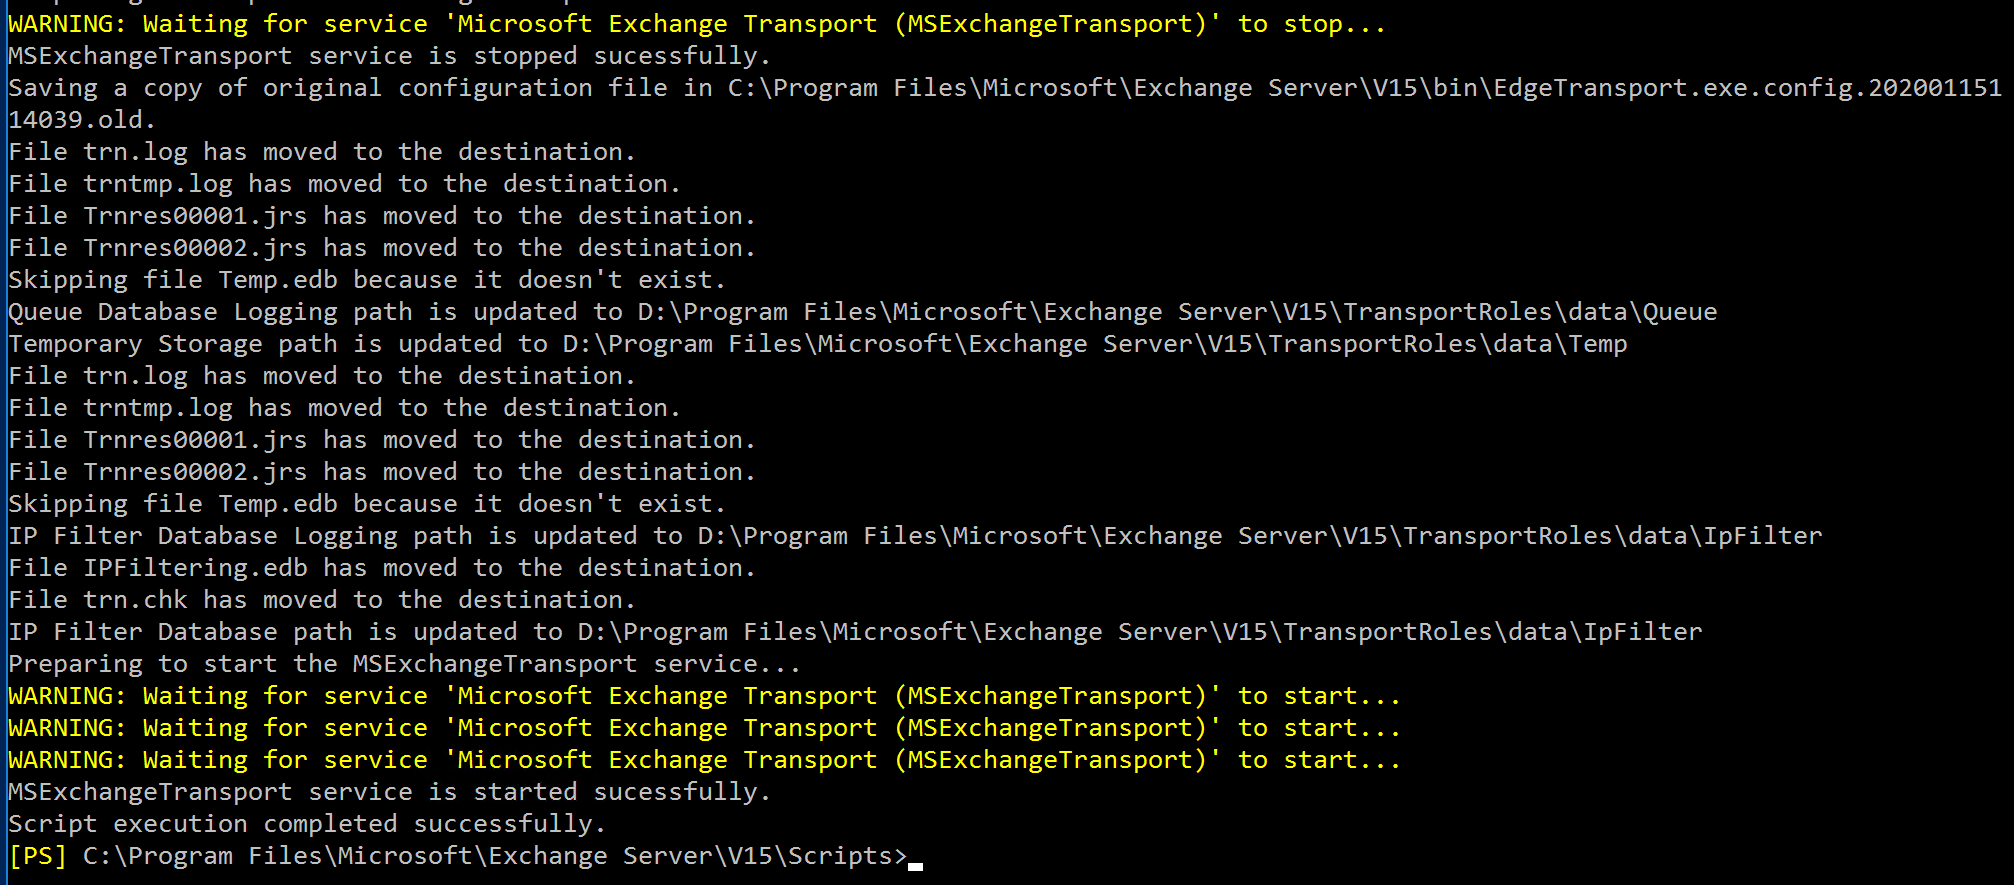
Preferred to do only for small databases as if the database is large the down time is huge you may need to move those files manually using adsiedit.msc which are not covered on this post.
Customers who did cutover or migrated their mailboxes to the cloud removed all the exchange servers environment then they think about bringing a new exchange server later point of time may end up with this error and there are some left over objects in the Active Directory environment. They quickest solution we found is to check which exchange server version was there in the environment lastly. Run PrepareAD with that setup once and re run the exchange server 2016 setup. Then the setup worked seamlessly. In my case the last exchange server was 2010. so ran preparead with exchange 2010
First Ran Exchange Server 2016 _ Error _
Couldn’t find the Enterprise Organization container.
Error:
A reboot from a previous installation is pending. Please restart the system and then rerun Setup.
For more information, visit: http://technet.microsoft.com/library(EXCHG.150)/ms.exch.setupreadiness.RebootPending.aspx
Error:
Setup encountered a problem while validating the state of Active Directory: Couldn’t find the Enterprise Organization container. See the Exchange setup log for more information on this error.
For more information, visit: http://technet.microsoft.com/library(EXCHG.150)/ms.exch.setupreadiness.AdInitErrorRule.aspx
Warning:
Setup will prepare the organization for Exchange Server 2016 by using ‘Setup /PrepareAD’. No Exchange Server 2013 roles have been detected in this topology. After this operation, you will not be able to install any Exchange Server 2013 roles.
For more information, visit: https://docs.microsoft.com/Exchange/plan-and-deploy/deployment-ref/readiness-checks?view=exchserver-2016
Warning:
Setup will prepare the organization for Exchange Server 2016 by using ‘Setup /PrepareAD’. No Exchange Server 2010 roles have been detected in this topology. After this operation, you will not be able to install any Exchange Server 2010 roles.
For more information, visit: https://docs.microsoft.com/Exchange/plan-and-deploy/deployment-ref/readiness-checks?view=exchserver-2016
A reboot from a previous installation is pending. Please restart the system and rerun setup or clear the below attribute and continue
Took backup of the key and Cleared attribute _ PendingFileRenameOperations instead of rebooting the server.
For Autodiscover to work properly in On premises and Exchange Online , We need email and User principal name to match. In the start of the project we have to do it once.
But for new users every time administrators cannot keep checking if its equal or not. it would be tiring to do it manually everytime. So if require you can run it on a task scheduler so that it maintains the UPN and Email to be same for the ones which is not matching.
Supported on Exchange 2013 or above | Premise or Exchange Hybrid Server
NOTE : Before running the script run below commands to check which are the mailboxes it will apply to
Known Errors – On Exchange 2010 it cannot take two pipelines together.
Pipeline not executed because a pipeline is already executing. Pipelines cannot be executed concurrently.
+ CategoryInfo : OperationStopped: (Microsoft.Power...tHelperRunspace:ExecutionCmdletHelperRunspace)
PSInvalidOperationException
+ FullyQualifiedErrorId : RemotePipelineExecutionFailed
To Avoid two pipelines. Save to variable and run the same.